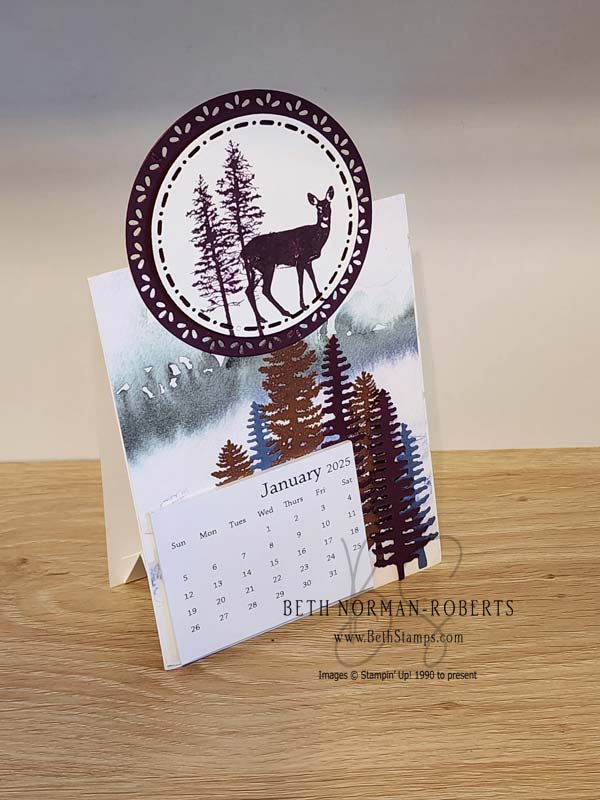
Are you in need of a masculine Calendar idea? Pairing Forever Forest and Grassy Grove made it easy to create a masculine calendar. This beautiful 6″ x 6″ designer series paper (DSP) lends itself to a quick card with a wow factor. Here I used retired DSP, , but any of the three other current DSP packs will work.
Hello friends!
I can’t believe my week off is already at the end. I dreamed of spending many more hours in the kitchen baking than I actually did, but I had a blast socializing. Yesterday I left my home at 8:30 am yesterday and didn’t get back until 6:45pm. Yesterday’s jam-packed day was good for the soul–I got to visit with my dear friends and got my hair coloured. Today I’m going to make date squares. Yes, I’m that old that I remember date squares. What is your favourite Christmas treat?
As you know, my daughter has cancer. She prepared her 3 and 7 year old daughters for the loss of her hair (so far no hair has fallen out) . She told the girls that she will be Miss Potato Head (after the potato head toy). When my 3 year old granddaughter got home from day care, she ran up in excitement to my daughter and asked if she was Miss Potato Head yet. When my daughter answered no, my granddaughter asked when she will be. That night when it was well past midnight, the little one creep-ed into the bedroom and asked her mom if she was Miss Potato Head yet. Out of the mouth of babes, eh?
Today, I want to share one of my recent projects with you. Every year I make calendars and place them in Christmas cards. This year one of my stamping friends asked if I would come up with masculine and feminine calendar calendar kits to sell. I was excited to jump right into designing a masculine calendar because I never made one before. Forever Forest is a well-loved stamp set for using on my masculine cards, so I thought why not try it on a calendar, and I think it worked out beautifully. The background felt a little bare so I created a small scene on a die cut circle and glued it on the top. Because I was hand delivering this calendar I didn’t have to worry about it fitting into a regular A2 envelope. The supplies I used, as well as directions, are below so you can recreate this calendar, or use it as a template.
Directions for Making Calender
DIRECTIONS FOR CALENDAR BASE
- Cut an 8 1/2″ x 11″ piece of cardstock in half by placing the short end on top; score at 5 1/2″. Burnish score lines.
- Cut a piece of cardstock 4″ x 4″; score at 1/2″, 2″, 3 1/2″. Burnish score lines.
- Lay the small piece of cardstock down so the lines are horizontal. Burnish each scored end (1/2″ and 3 1/2″ line) so that the edges of the inside base are facing upwards. Glue in place on the front and back to create a 4 1/4″ x 5 1/2″ front.
DIRECTIONS FOR DECORATING THE FRONT
- Cut a 2 3/4″ circle of white cardstock. Cut the next largest size (3 1/4″) in coloured cardstock. I used Blackberry Bliss. Decorate the front using Grassy Grove.
- Using the three joined trees in Forever Forest, stamp out using Versamark, and emboss with bronze embossing powder, as seen above.
- Using Misty Moonlight and Blackberry Bliss, die cut trees and glue three trees in between the bronze embossing, and pop dot the Blackberry Bliss tree on the right hand side
- Glue down calendar.
- Glue topper.
As always, enjoy your paper crafting and please share your projects with me. I enjoy seeing what other creative minds come up with and am frequently inspired by them.
Happy Stampin’., Beth
Product List


")


")


I love this calendar. The topper is a nice added touch! Thanks for sharing.