
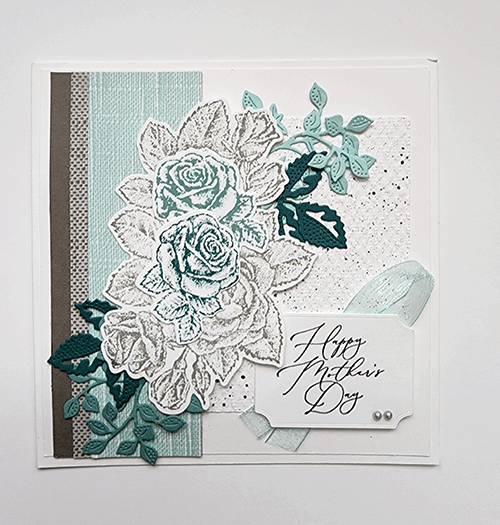
The ever-so-lovely Nature’s Symphony Bundle absolutely sings to my creative soul. Today I had fun playing with rich, feminine colours. You’ll find the complete measurements and step-by-step directions below, along with detailed photos of each product I used. Feel free to click on any photo to shop the supplies and recreate this project for yourself!

Hello Friends,
Did you purchase this month’s Product of the Month? You can see the beautiful Painted Illusions Designer Series Paper (DSP) below as well as on my card background. It’s such a delightful package with bold swirls of colour on one side and more subdued colours on the other. In two short weeks I used the entire package of Painted Illusions up on many cards/projects. Spend $100 before taxes and shipping and for $5 you can purchase Painted Illusions.

Card Details
MEASUREMENTS
- Basic White (base): 5 1/2″ x 8 1/2″ scored at 4 1/4″
- Pretty Peacock (first layer): 4 2/16″ x 5 5/16″
- Pretty Peacock (verticle mat): 2 1/8″ x 4 1/2″
- Pretty Peacock (horizontal top piece): 1 10/16″ x 3 13/16″
- Granny Apple Green (horizontal mat): 4″ x 1 3/4″
- Granny Apple Green (horizontal top piece): 1 10/16 x 3 13/16″
- Granny Apple Green (sentiment): scrap
- Berry Burst (branch): scrap
- Fresh Freesia (branch) scrap
- DSP: 4″ x 5 1/4″
- Adhesive backed dots, sequins or rhinestones
DIRECTIONS
- Adhere the DSP to the Pretty Peacock (first layer)
- Prior to embossing the Granny Apple Green and Pretty Peacock top pieces, very lightly spritz water to the back of the cardstock to enhance the depth of the embossing. This process relaxes paper fibre.
- Emboss Granny Apple Green (verticle top piece) using Soft Waves embossing folder
- Emboss Pretty Peacock (horizontal top piece) using Changing Leaves embossing folder
- Adhere Granny Apple Green (verticle top piece) to Pretty Peacock (mat)
- Adhere Pretty Peacock (horizontal top piece) to Granny Apple Green (mat)
- Adhere verticle mat and top piece to DSP as shown above
- Adhere horizontal mat and top piece to DSP as shown above
- Die cut one leaf branch using Berry Burst and one branch using Fresh Freesia
- Use Berry Burst Ink and Blending Brush to add colour to the bottom of each Berry Burst leaf
- Use Fresh Freesia and Blending Brush to add colour to the bottom of each Fresh Freesia leaf
- Center the Berry Burst branch and lay it down flat
- Center the Fresh Freesia and offset the Berry Burst Branch.
- Using glue, glue down individual leaves, carefully folding random leaves underneath and on top of each other. I didn’t glue down each and every leaf; just here and there
- Add a sentiment to the front. Use the small elongated oblong die from Textured Note Dies to cut out a piece of Granny Apple Green
- With the embossing buddy, lightly rub all over the Granny Apple Green die cut
- Ink up the sentiment with VersaMark and stamp out onto the Granny Apple Green die cut
- Sprinkle Copper Stampin’ Emboss Powder over the Versamark and gently shake off excess powder
- Heat set powder with Heat Embosser
13. Adhere dimensionals to the back of the sentiment and set in place as desired
14. Adhere rhinestones of choice
As always, have the BEST time getting crafty! I can’t wait to see what you create, so please share your projects with me! Seeing your beautiful ideas and clever twists absolutely makes my day–and honestly, you inspire me more than you know!
Product List![Basic White 8 1/2" X 11" Cardstock [ 166780 ]](https://assets1.tamsnetwork.com/images/EC042017NF/166780s.jpg "Basic White 8 1/2\" X 11\" Cardstock [ 166780 ]")
![Pretty Peacock 8-1/2" X 11" Cardstock [ 150880 ]](https://assets1.tamsnetwork.com/images/EC042017NF/150880s.jpg "Pretty Peacock 8-1/2\" X 11\" Cardstock [ 150880 ]")
![Granny Apple Green 8-1/2" X 11" Cardstock [ 146990 ]](https://assets1.tamsnetwork.com/images/EC042017NF/146990s.jpg "Granny Apple Green 8-1/2\" X 11\" Cardstock [ 146990 ]")
![Berry Burst 8-1/2" X 11" Cardstock [ 144243 ]](https://assets1.tamsnetwork.com/images/EC042017NF/144243s.jpg "Berry Burst 8-1/2\" X 11\" Cardstock [ 144243 ]")
![Fresh Freesia 8 1/2" X 11" Cardstock [ 155613 ]](https://assets1.tamsnetwork.com/images/EC042017NF/155613s.jpg "Fresh Freesia 8 1/2\" X 11\" Cardstock [ 155613 ]")
![Painted Illusions 12" X 12" (30.5 X 30.5 Cm) Designer Series Paper [ 167977 ]](https://assets1.tamsnetwork.com/images/EC042017NF/167977s.jpg "Painted Illusions 12\" X 12\" (30.5 X 30.5 Cm) Designer Series Paper [ 167977 ]")
![Berry Burst Classic Stampin' Pad [ 147143 ]](https://assets1.tamsnetwork.com/images/EC042017NF/147143s.jpg "Berry Burst Classic Stampin' Pad [ 147143 ]")
![Granny Apple Green Stampin' Pad [ 147095 ]](https://assets1.tamsnetwork.com/images/EC042017NF/147095s.jpg "Granny Apple Green Stampin' Pad [ 147095 ]")
![Heat Tool (Us And Canada) [ 129053 ]](https://assets1.tamsnetwork.com/images/EC042017NF/129053s.jpg "Heat Tool (Us And Canada) [ 129053 ]")
![Embossing Additions Tool Kit [ 159971 ]](https://assets1.tamsnetwork.com/images/EC042017NF/159971s.jpg "Embossing Additions Tool Kit [ 159971 ]")
![Metallics Embossing Powders [ 155555 ]](https://assets1.tamsnetwork.com/images/EC042017NF/155555s.jpg "Metallics Embossing Powders [ 155555 ]")
![Small Blending Brushes [ 160518 ]](https://assets1.tamsnetwork.com/images/EC042017NF/160518s.jpg "Small Blending Brushes [ 160518 ]")
![Multipurpose Liquid Glue [ 110755 ]](https://assets1.tamsnetwork.com/images/EC042017NF/110755s.jpg "Multipurpose Liquid Glue [ 110755 ]")
![Stampin' Dimensionals [ 104430 ]](https://assets1.tamsnetwork.com/images/EC042017NF/104430s.jpg "Stampin' Dimensionals [ 104430 ]")
![Fabulous Sayings Photopolymer Stamp Set (English) [ 167972 ]](https://assets1.tamsnetwork.com/images/EC042017NF/167972s.jpg "Fabulous Sayings Photopolymer Stamp Set (English) [ 167972 ]")
![Nature Walk Suite Collection (English) [ 166936 ]](https://assets1.tamsnetwork.com/images/EC042017NF/166936s.jpg "Nature Walk Suite Collection (English) [ 166936 ]")
![Nature's Symphony Bundle (English) [ 166926 ]](https://assets1.tamsnetwork.com/images/EC042017NF/166926s.jpg "Nature's Symphony Bundle (English) [ 166926 ]")
![Soft Waves 3 D Embossing Folder [ 164695 ]](https://assets1.tamsnetwork.com/images/EC042017NF/164695s.jpg "Soft Waves 3 D Embossing Folder [ 164695 ]")
![Changing Leaves Hybrid Embossing Folder [ 164138 ]](https://assets1.tamsnetwork.com/images/EC042017NF/164138s.jpg "Changing Leaves Hybrid Embossing Folder [ 164138 ]")
![Stampin' Cut & Emboss Machine [ 149653 ]](https://assets1.tamsnetwork.com/images/EC042017NF/149653s.jpg "Stampin' Cut & Emboss Machine [ 149653 ]")
Happy Stampin’,

Wow! This is so eye popping! I love the bright colors and card design.
So pretty, love the details on those leaves!