
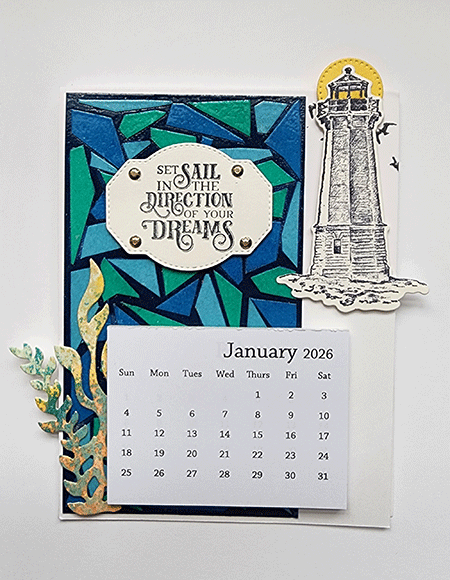
A little behind the eight ball, I’m just now making 2026 calendars. This maritime calendar is made for a work friend who is from Nova Scotia.
Hello Friends,
Do you make calendars? I love the challenge of having a small space to work in and I was actually surprised at how well this came together. I love putting mosaics together because it is like putting together a tiny puzzle.
Bringing out my photo tutorial experience working for the Technique Junkie Newsletter, I’m going to deliver step-by-step photo tutorials until I can teach myself to edit videos. I have one video in the waiting now. In today’s tutorial I have one extra photo for you, and will start my step-by-step process in my next tutorial. If you have any technique requests, just reach out.
Maritime Calendar
CALENDAR
- Base: Thick Basic White 4 1/4″ x 11″, scored at 5 1/2″
- Inside insert to hold your calendar in place: 4″ x 4″, scored 1/2″ on each side and 2″ down the middle
- Fold the insert ends upwards and the centre fold upwards to create a W
- Place glue or adhesive along the edge of one 1/2 score line and adhere to the bottom of the card front. Repeat with the second 1/2″ side
DECORATING THE CALENDAR
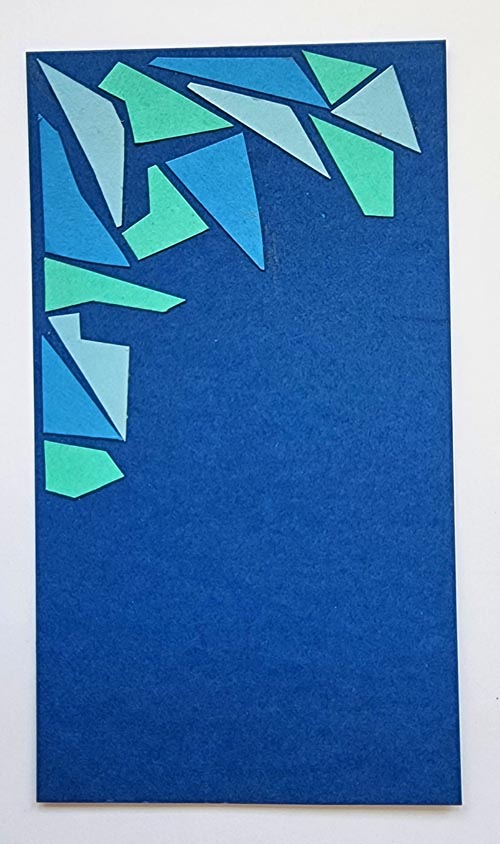
- Blueberry Bushel: 3″ x 5 7/8″
- Scraps of Balmy Blue, Coastal Cabana, Azure Afternoon
- Cut tiny pieces of cardstock in the shape of triangles and triangle-like shapes
- Glue pieces at random, leaving a tiny space between each scrap onto Blueberry Bushel (please see photo below)
- Stamp lighthouse in Night of Navy or Secret Sea and die cut (I used the lighthouse from Sailing Home)
- Cut a small circle (I used the smallest die from Stylish Shapes) using Daffodil Delight and glued it behind the lighthouse
- Using Colour Blend in Daffodil Delight, colour the inside where the light would shine
- Cut seaweed in designer series paper that has multiple colours–often the backside of DSP that has a bold design. I made the seaweed out of watercolour paper and ink (seaweed was from the Sailing Home stamp and die set)
9. Stamp the sentiment onto Basic White, using either Secret Sea or Night of Navy
10. Using the coordinating die from Sailing Home, cut out the sentiment
11. Glue the mosaic in place close to the left edge of the calendar front
12. Add two dimensionals to the back of the calendar, keeping them centered. This allows you to pop off the calendar and replace it with a 2027 calendar
13. Place dimensionals to the back of the lighthouse and adhere in place on the upper right hand side of the calendar
14. Cut seaweed and glue in place. By having two dimensionals on the backside of the mini calendar there is allowance to tuck the seaweed inwards.
As always, enjoy your paper crafting and please share your projects with me. I enjoy seeing what other creative minds come up with and am frequently inspired by them.
Happy Stampin’


You do such a beautiful job with your calendars, this is perfect for your friend!