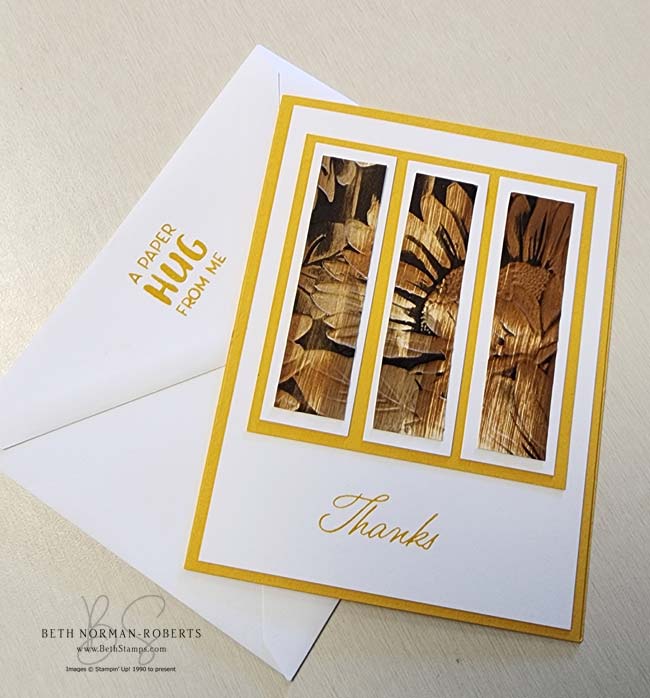
The Sunflower 3D embossing folder is extremely popular. There are so many tutorials and samples out there that you could review this embossing folder for a full day between YouTube and blogs. I’m glad I bought my embossing folder early because it is sold out again but will be restocked on the week of August 25th.

Hello Stamping Friends,
Hi there friends!
What a great week I’m having on vacation at the trailer. Tomorrow I’m looking forward to Fibre Fest in Petrolia. My artsy girlfriend has found her place after starting out in rubber stamping, altered books, gelli plate printing right along side with me. I’ve mentioned before that there came a point almost three years ago that I was contemplating running with my mixed media that I love so much, or becoming a Stampin’ Up! demonstrator. Being a demonstrator is a passion, and now fibre art is Carol’s. We still get together to work our own projects. How I love to see Carol’s progression on in sewing by hand and machine on one piece, complete with watercoloured cloth background, and even stamping and stencils. Tomorrow I’m going to see all of Carol’s artwork displayed, some for sale, some for display only, at the Lion’s Park in Petrolia. If you’re in the area I encourage you to visit Fibre Fest. The beauty of professional hand crafted fibre products is breathtaking.
Sunflower 3D Distressed Tutorial
If you don’t own this particular embossing folder, substitute with Designer Series Paper.
Crushed Curry Card Base: 5 1/2″ x 8 1/2″, scored at 4 1/4″
Crushed Curry 3 1/2″ x 3 1/2″
White: 4″ x 5 1/4″ and three pieces of 1″ x 3 1/4″
White for Embossing: 4 1/4″ x 5 1/2″
- Emboss Sunflower 3D in the Stampin’ Cut & Emboss machine
- Using the backside, also known as the debossed side, lightly swipe Crumb Cake from the top to the bottom of the debossed cardstock
- Repeat step 2 using Pecan Pie and then Early Espresso. It doesn’t matter if there is a streaky look
- Heat set the ink with a heat gun
- Stamp a sentiment on the bottom of the card front
- Glue the square piece of Crushed Curry above the sentiment
- Cut three pieces from the debossed and inked cardstock at 3/4″ x 3″
- Glue the cut and inked cardstock to the 1″ x 3 1/4″ pieces of white cardstock
- Glue down the long strips equally side-by-side onto the square Crushed Curry cardstock.
- Adhere the square Crushed Curry on the top of the card front.
As always, enjoy your paper crafting and please share your projects with me. I enjoy seeing what other creative minds come up with and am frequently inspired by them.
Happy Stampin’,


Oh my gosh girl – I am SO in love with the colors and dimension of this card! Love the split panels – you are so amazing!!! Love ya lots!
Very cool, that technique and the color inks you used gave it a wooden look to it, very interesting!